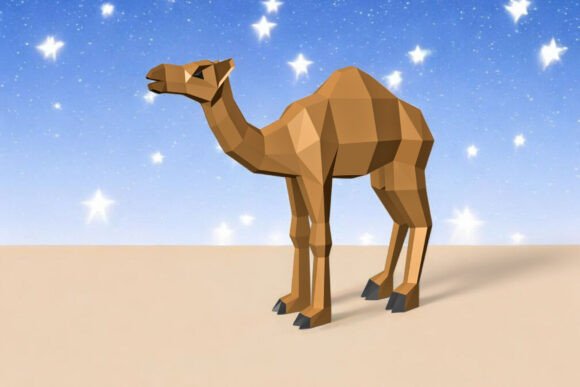
Camel - 3d Papercraft
In an era defined by digital saturation and fleeting attention spans, the value of tangible, hands-on engagement has not diminished; rather, it has become a strategic differentiator. For professionals, creators, and hobbyists alike, the pursuit of meaningful projects often intersects with the need for stress relief, creative expression, and precise skill development. This is where Camel - 3d Papercraft emerges not merely as a toy, but as a disciplined exercise in patience, geometry, and design appreciation. By downloading high-quality digital files and assembling them into a physical form, you engage in a process that demands focus and yields a concrete result—a rare commodity in modern knowledge work.
The specific product in question offers a comprehensive suite of digital assets designed to facilitate this assembly. With an estimated Assembling Time of just 30 minutes, it provides an accessible entry point for both seasoned papercraft enthusiasts and those new to the medium. The final Assembled Size of 10 x 9 x 25 CMS strikes a balance between visibility and manageability, making it suitable for display on a desk, shelf, or workspace without dominating the environment. Understanding the technical specifications and the strategic benefits of this project allows you to integrate it effectively into your routine, whether for personal enrichment, educational demonstration, or brand-related creative exercises.
Strategic Value of Tangible Creation
Why should a professional or entrepreneur invest time in assembling a paper model? The answer lies in the cognitive shift required when moving from screen to material. Digital work is abstract; results are often invisible until rendered. In contrast, Camel - 3d Papercraft requires spatial reasoning, fine motor coordination, and sequential logic. Each step builds upon the previous one, reinforcing the importance of accuracy and planning. This mirrors professional workflows where small, correct decisions compound into successful outcomes.
For educators and trainers, this activity serves as a practical metaphor for project management. It illustrates how complex structures are built from simple components. When you examine the templates, you are looking at a deconstructed system. Reassembling it teaches respect for structure, precision, and the integrity of the design. It is a low-stakes environment to practice the very skills—attention to detail and adherence to instructions—that drive high-performance operations in business and engineering.
Understanding the Deliverables
The success of any papercraft project hinges on the quality and versatility of the source files. The package for Camel - 3d Papercraft is robust, providing a wide array of formats to suit different printing capabilities and user preferences. You will receive:
- PDF: Ideal for standard printing and immediate use. Its universal compatibility ensures that most users can open and print the document without specialized software.
- DXF: A vector format preferred by CAD (Computer-Aided Design) users and laser cutting machines. This allows for higher precision if you have access to automated fabrication tools.
- EPS: Another vector format widely used in graphic design, offering scalability without loss of quality.
- PNG and JPG: Raster image formats suitable for quick previews or basic editing in standard image processors.
This variety ensures that whether you are a casual user printing at home or a professional using a commercial printer, you have the appropriate tool for the job. The inclusion of multiple file types underscores the provider’s commitment to usability and accessibility, reducing friction in the acquisition phase.
Preparation: Setting Up for Success
To achieve a clean, professional-looking assembly, preparation is key. The instructions specify a clear list of requirements, each serving a distinct purpose in the construction process. Using the right tools minimizes errors and enhances the longevity of the final model.
- Cardstock Paper: Standard printer paper is often too thin and flimsy for 3D structures. Cardstock provides the necessary rigidity to hold shape while remaining easy to fold. Ensure you select a weight appropriate for your printer’s specifications.
- Colored Printer: While black-and-white models can be colored manually, a colored printer saves significant time and ensures consistent shading across all pieces. This is crucial for maintaining the visual integrity of the camel’s design.
- Cutting Tools: Sharp scissors are sufficient for straight cuts, but a craft knife paired with a cutting mat is recommended for intricate curves and detailed shapes. Precision here prevents jagged edges that can compromise glue adhesion.
- Adhesive: Use a high-quality glue stick or liquid craft glue. Liquid glue offers stronger bonds but requires careful application to avoid warping the paper. Allow adequate drying time between steps.
- Folding Aids: A scorer or bone folder is essential for creating crisp, accurate creases. If these are unavailable, a non-working ball point pen can serve as a substitute. Pressing lightly along the fold lines before bending ensures sharp angles and neat corners.
- Measurement Tools: A ruler helps align pieces accurately, especially when dealing with symmetrical parts like legs or ears.
The Assembly Process: A Mindful Practice
With your materials ready, the assembly of Camel - 3d Papercraft begins. The process typically involves three main phases: cutting, scoring, and gluing. Although the estimated time is 30 minutes, do not rush. Treat this as a meditation on precision.
Phase 1: Cutting
Lay out all the printed sheets. Identify the pieces by their labels or numbers. Cut carefully around the outer boundaries. Remember, it is better to cut slightly outside the line than inside, as excess material can sometimes be trimmed later, but missing material cannot be replaced.
Phase 2: Scoring and Bending
This is the most critical step for structural integrity. Use your scorer or bone folder to press down firmly along all dashed or indicated fold lines. Fold the paper away from the score line to create a valley fold, or towards it for a mountain fold, as indicated by the template. A well-scored fold will lie flat and sharp, giving the camel its realistic posture.
Phase 3: Gluing
Start with the largest sections, such as the body and head, building them up layer by layer. Apply glue sparingly to the designated flaps. Press the pieces together firmly and hold for a few seconds. Check alignment frequently. As you assemble the legs and neck, ensure they are perpendicular to the body to maintain stability. The final result should stand upright, showcasing the anatomical details captured in the design.
Intentional Use Cases and Applications
Once assembled, Camel - 3d Papercraft becomes more than a static object. It can serve various strategic purposes depending on your goals.
For Educators: Use the model in biology or geography classes to discuss desert ecosystems, animal anatomy, or trade routes. The tactile nature of the model aids memory retention compared to 2D images.
For Marketers and Branders: Consider customizing the color scheme to match your brand identity. A branded papercraft model displayed at events or in offices can serve as a unique conversation starter, demonstrating creativity and attention to detail. It reflects a brand that values craftsmanship and tangible quality.
For Personal Well-being: In a high-pressure work environment, dedicating 30 minutes to a focused, analog task can reduce cortisol levels. The repetitive motion of cutting and folding induces a flow state, allowing the mind to rest from digital notifications and endless scrolling.
Risks and Considerations
While beneficial, there are pitfalls to avoid. The primary risk is impatience. Rushing the scoring process leads to ragged folds, which weaken the structure and look unprofessional. Similarly, using the wrong type of paper can result in a floppy, unstable model that fails to meet expectations. Always verify that your cardstock is compatible with your printer before starting the entire batch.
Another consideration is storage. Once assembled, the model is durable but not indestructible. Keep it away from direct sunlight to prevent fading, and handle it gently to avoid bending the delicate features. If you plan to transport it, consider disassembling and storing the pieces in their original packaging or a protective box.
Conclusion: Making the Most of Your Investment
Camel - 3d Papercraft is more than a pastime; it is a structured activity that rewards patience and precision. By leveraging the provided digital files (PDF, DXF, EPS, PNG, JPG) and following the recommended assembly guidelines, you can create a lasting artifact that enhances your workspace or educational toolkit. Whether used for learning, branding, or personal relaxation, the key to success lies in intentional execution. Take your time, use the right tools, and appreciate the process. The result is not just a paper camel, but a testament to your ability to bring complex ideas into tangible reality.
If you encounter any challenges during assembly, remember that the digital nature of the files means support is often readily available. Do not hesitate to ask questions or seek clarification. Engaging fully with the process ensures you get the maximum benefit from this creative endeavor.