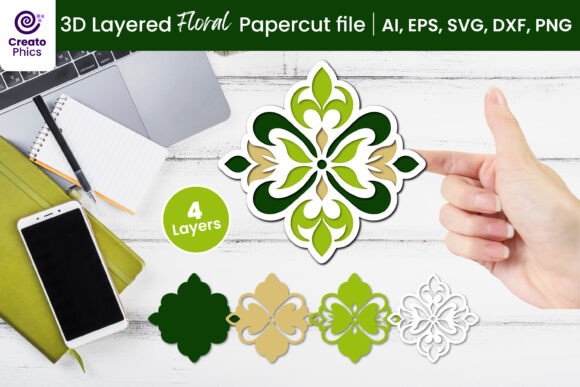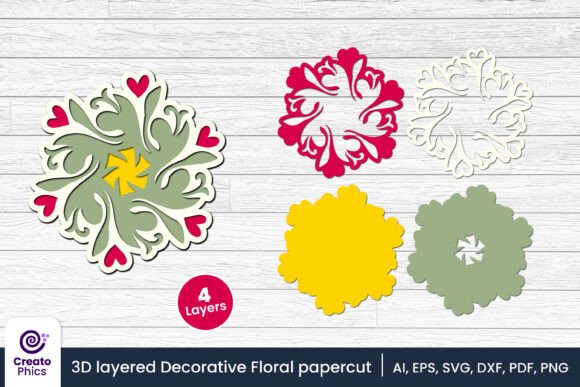
3D Layered Decorative Floral Papercut
There is a specific kind of satisfaction in watching a flat sheet of paper transform into something with depth, shadow, and life. It isn’t just about cutting shapes; it is about engineering light and space through simple materials. The 3D Layered Decorative Floral Papercut represents exactly this intersection of artistic vision and technical precision. Unlike traditional flat cardstock designs, this approach relies on stacking multiple layers to create a botanical illusion that feels tangible. For crafters, small business owners, and design enthusiasts, this isn't merely a digital file—it is a toolkit for adding elegance and dimension to everyday objects.
At its core, a 3D layered papercut involves separating a complex image into distinct components, or "layers." Each layer is cut individually and then adhered at precise intervals using spacers (often foam tape or thin cardstock strips). This separation allows shadows to form between the layers, giving the final piece a three-dimensional quality that catches the eye. When applied to floral motifs—nature’s most intricate designs—the result is a stunning representation of blooms that appear to pop off the surface. Whether you are looking to elevate your home decor or streamline your product line, understanding how to leverage these designs can significantly enhance your creative output.
Why Choose Layered Floral Designs?
The appeal of floral papercuts goes beyond aesthetics; it is about versatility. Flowers are universal symbols of growth, beauty, and celebration, making them suitable for almost any occasion. However, the 3D aspect adds a premium feel that flat prints simply cannot match. When you use a pre-designed vector set like the one described here, you are bypassing the trial-and-error phase of pattern creation. Instead of spending hours trying to figure out which petals should overlap to create the best shadow effect, you get a professionally organized file where each layer is already separated and optimized.
This efficiency is crucial for anyone balancing creativity with other responsibilities. For the hobbyist, it means more time spent assembling and less time troubleshooting. For the entrepreneur, it translates directly to faster production times and consistent product quality. The design features a 12-inch by 12-inch canvas, which is a standard size for many crafting projects, ensuring that your creations fit perfectly into common frames, scrapbook pages, or display boxes without awkward resizing issues.
Real-World Applications: From Home to Business
One of the strongest arguments for investing in high-quality SVG papercut files is their adaptability across different sectors. Let’s look at how different users might integrate this resource into their workflows.
Home Decor and Personalization
For interior design lovers, these layers offer a cost-effective way to create bespoke art. Imagine creating a large-scale wall hanging for a nursery or a serene reading nook. By printing the layers on heavyweight cardstock or even vellum for a stained-glass effect, you can build a shadow box that changes appearance depending on the angle of the light. The natural botanical theme brings a calming, organic touch to modern interiors, bridging the gap between minimalist design and cozy warmth. It is also an excellent project for weekend bonding, allowing families to assemble a unique piece of art together.
Weddings and Event Planning
The wedding industry is constantly seeking ways to add personal touches that feel luxurious but remain budget-friendly. A 3D floral papercut can serve as a sophisticated alternative to expensive floral arrangements. Use it as a backdrop for a photo booth, a centerpiece insert for table settings, or even as part of the invitation suite itself. Because the design is scalable and clean, it photographs beautifully, which is essential for social media sharing—a key concern for modern event planners and couples alike. The layered effect adds depth to photos, making the details stand out against busy backgrounds.
Small Business and E-commerce
If you run a boutique on Etsy or sell handmade goods locally, consistency is king. Using a standardized digital file ensures that every single item you produce looks identical, reducing customer complaints and returns. You can offer these as DIY kits, where customers buy the pre-cut layers or the digital file to print themselves. Alternatively, you can produce finished pieces. The inclusion of multiple file formats (SVG, EPS, AI, DXF) means you can cater to different client needs. Some clients may want laser-cut wood or acrylic signs, while others prefer paper cards. Having all these formats ready allows you to pivot quickly based on material availability or trend shifts.
Education and Therapeutic Crafts
In educational settings, these designs teach spatial reasoning and fine motor skills. Teachers can use the separate PNG layers to demonstrate how complex images are built from simple parts. For occupational therapy or mindfulness practices, the repetitive, focused nature of aligning and gluing layers provides a meditative experience. It requires concentration but is not overly stressful, making it accessible for adults dealing with anxiety or seniors looking for engaging cognitive exercises.
Technical Considerations and Workflow Tips
While the concept sounds straightforward, achieving a professional finish requires attention to detail. The provided package includes SVG, EPS, AI, DXF, PDF, and 300 DPI PNG files. Each format serves a specific purpose in your workflow:
- SVG and DXF: These are essential for electronic cutting machines like Cricut and Silhouette. They contain the vector paths that guide the blade. Ensure your machine software recognizes the layer order to avoid cutting errors.
- EPS and AI: Best for vector editing in Adobe Illustrator or CorelDRAW. If you need to resize elements non-destructively or combine this design with other graphics, these formats provide the highest flexibility.
- PNG (300 DPI): With each layer as a separate file, these are perfect for printing directly if you do not have a cutting machine. They ensure crisp edges when printed on standard inkjet or laser printers.
When assembling, the choice of adhesive matters. Standard white glue can warp thin paper, so consider using a precision glue pen or double-sided tape dots. For true 3D effects, foam adhesive squares are ideal because they provide immediate lift and shadow. Experiment with spacing; too much distance can make the flower look disconnected, while too little can cause layers to merge visually. Start with smaller scales to test your alignment technique before committing to large-format wall art.
Choosing the Right Material
The visual impact of your 3D floral papercut is heavily dependent on the material you choose. Standard printer paper will likely be too flimsy to hold its shape over time. Cardstock ranging from 65lb to 110lb is the sweet spot for most projects, offering durability without being difficult to cut. For a more rustic look, kraft paper or textured cotton paper adds character. For a delicate, ethereal vibe, try tracing the layers onto vellum or acetate. This transparency allows light to pass through, creating beautiful color blending effects if you layer different hues.
Consider the end-use environment as well. If the piece will hang near a window, UV-resistant materials or laminating certain layers can prevent fading. For gifts that will be handled frequently, sealing the back or mounting the entire assembly on a sturdy backing board protects the delicate layers from bending or tearing.
Final Thoughts on Creative Integration
The 3D Layered Decorative Floral Papercut is more than just a craft project; it is a versatile asset that bridges the gap between digital convenience and analog craftsmanship. By providing multiple formats and a clear structural layout, it empowers users to experiment with scale, material, and context. Whether you are designing a custom wedding invitation, stocking shelves for your online store, or simply enjoying a quiet afternoon building a shadow box, this design offers a reliable foundation for creativity.
Success with this type of project lies in patience and experimentation. Do not be afraid to mix colors, vary the background textures, or combine this floral motif with typography or geometric shapes. The goal is to make the piece yours. As you become more comfortable with the layering process, you will find that the possibilities extend far beyond flowers, opening the door to landscapes, portraits, and abstract art. Start with the included files, master the assembly, and let your imagination dictate the next steps.